• Skip to main content
  • Skip to primary sidebar
Inside BruCrew Life
menu icon
go to homepage
  • 4th of July Recipes
  • About Me
  • Recipe Index
  • Contact
  • Subscribe
    • Facebook
    • Instagram
    • Pinterest
    • Twitter
  • subscribe
    search icon
    Homepage link
    • 4th of July Recipes
    • About Me
    • Recipe Index
    • Contact
    • Subscribe
    • Facebook
    • Instagram
    • Pinterest
    • Twitter
  • ร—
    Home ยป Crafts

    How To Make Braided Headbands

    Modified: Mar 7, 2017 ยท Published: Jun 23, 2010 by Jocelyn ยท As an Amazon associate, I earn from qualifying purchases. This post may contain affiliate links ยท 86 Comments

    826 shares
    • Share2
    • Tweet
    How To Make Braided Headbands - easy tutorial for making braided headbands
    I have been having a blast making these
    fun braided flower headbands.
    I usually cut all my strips
    and park on the couch to catch up on
    Next Food Network Star
    or Cupcake Wars...
    or whatever catches my attention
    and just braid away.
    How To Make Braided Headbands
    Now I realize there are 2 types of people:
    A. those who won't buy a craft project because you can make it tons cheaper
    B. those who have no desire to get crafty and would rather pay someone elseIf you are a B person...you might want to skip those post. I am doing this tutorial for you A's out there.I tried making the rolled flowers that are super popular
    and just wanted to change it up a bit.

    I remember as a kid braiding strips of fabric and
    sewing them into rugs for my sisters doll houses.
    So, I thought why couldn't they be flowers for headbands?

    And thus began another obsession...
    I LOVE these headbands.
    They look great on straight or curly hair
    and look awesome when worn with an updo.

    Supplies needed:
    Fabric, needle & thread, glue gun & glue sticks, stretch headband, felt, beads/jewels

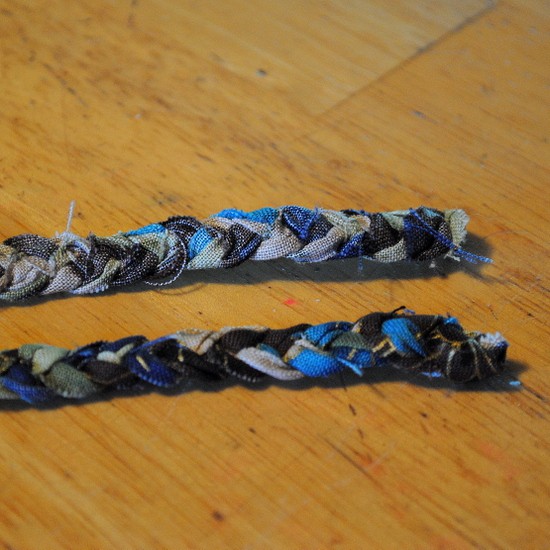
    1. Cut out 6 strips of fabric.
    3 strips - 24 inches long, slightly wider than ยฝ" wide
    3 strips - 16 inches long, slightly wider than ยฝ" wide
    Let it fray...it looks so shabby chic when done.

    2. Sew the tips of 3 - 24 inch strips together and cut at an angle.
    Repeat on the other 16 inch strips.

    braided headbands 4
    3. Braid the strips.
    Sew the ends when you reach the bottom and
    cut at an angle like the top.

    braided headbands 5
    4. Start rolling the braid up FLAT and stitch it in place.
    As you continue wrapping the braid around,
    keep stitching in place on the back side.

    braided headbands 6

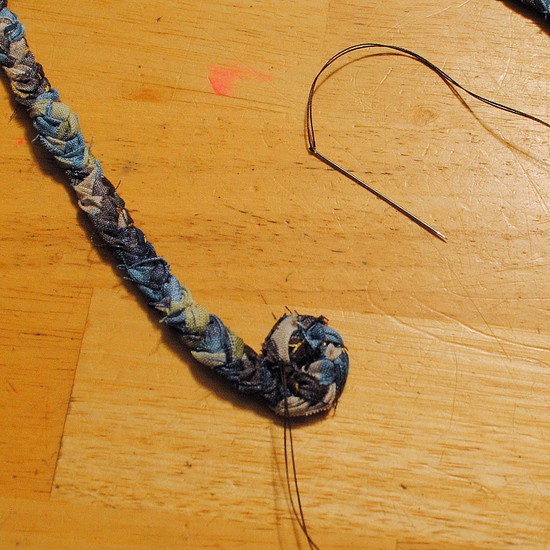
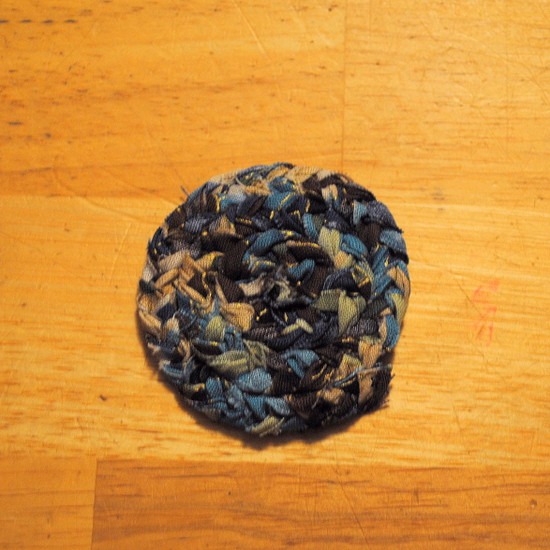
    5. When you finish wrapping, you should have 2 discs
    that look like this.

    braided headbands 7
    6. Glue a stretch headband on the back of both braided discs, overlapping the discs slightly if you wish.
    Glue a round piece of felt on top
    of the headband to hide it.
    (sorry I forgot to take a pic of this step)
    Glue on beads or jewels on the front of the braided discs for some bling.

    7. Put on your new headband and
    go out for an impromptu shoot
    with the resident helper photographer...
    aka...the 11 yr. old 🙂

    How To Make Braided Headbands

    See how cute these are for dressing up a pony tail????

    More Crafts

    • Three chocolate monster cookies on a stick decorated with candies and frosting.
      Chocolate Monster Sugar Cookies
    • Half of a Nutella Cream Egg sitting on top of another one surrounded by blue filler paper.
      Nutella Cream Eggs
    • A candy turkey with candy corn tail on a white paper.
      Reese's Candy Turkeys
    • Rustic Wood Ornaments
    826 shares
    • Share2
    • Tweet


    Jocelyn is the owner and creator of Inside BruCrew Life where she loves to share semi-homemade recipes with flair that anyone can recreate in their own kitchen. Jocelyn is married and has three kids. She loves to workout, enjoys trips to Disney, and relaxing at the beach.

    Learn More About Jocelyn

    Reader Interactions

    Comments

    1. PeaceLoveApplesauce

      June 25, 2010 at 2:31 am

      Fabulous.. I love headbands, especially ones that are easy to make!

      Reply
    2. Sara

      June 24, 2010 at 11:45 pm

      This is so true, and then theres those of us, who go back and forth. Sometimes I buy stuff out of laziness, and sometimes I make stuff. LOL. Those are really cute!

      Reply
    3. Angie

      June 24, 2010 at 11:27 pm

      very cute. I may have to try this one. I'm following you from social parade follow friday. Stop by when you get a chance: http://angiewith2.blogspot.com/

      Reply
    4. Katie

      June 24, 2010 at 6:31 pm

      jocelyn-would it be okay if I post my results on my blog tomorrow? (I made two)...I will gladly link to this post and your etsy shop ๐Ÿ™‚ let me know as soon as you can!

      Reply
    5. Miss Jody

      June 24, 2010 at 6:13 pm

      You!
      my
      friend
      are just
      crafty-
      wonderful!!!!
      I heart you!!!

      Reply
    6. Mich

      June 24, 2010 at 4:52 pm

      Cute idea. My daughter would love them!

      Reply
    7. theultimate

      June 24, 2010 at 2:33 pm

      How fun! =]

      Reply
    8. Katie

      June 24, 2010 at 2:15 pm

      i made one this morning already!!!! I LOVE IT!

      Reply
    9. MrsB

      June 24, 2010 at 1:43 pm

      soooo cute.

      Reply
    10. Laina

      June 24, 2010 at 1:08 pm

      wasn't sure what this would look like, but when I saw the picture....adorable! What a great idea, and it's so cute!

      Reply
    11. Amanda T

      June 24, 2010 at 1:07 pm

      Hey There! ๐Ÿ™‚

      Thanks for linking up with Wobble Over Wednesday! I hope you'll join in next week too! ๐Ÿ˜€

      -Amanda T
      http://mylifewithratsandmore.blogspot.com

      Reply
    12. anythingbutperfect

      June 24, 2010 at 1:34 am

      that's super cute! there is no way I can pay money for my girls headbands when they are so much cheaper to make and so much more unique! thanks for sharing!

      Reply
    13. Julianne Hendrickson

      June 24, 2010 at 12:26 am

      You are so crafty and I am definitely a B! I just can't stand to take the time to do it, and not only that but even worse, I STINK at crafts. Who would know I am a teacher!? Haha. Love them...you are so talented! Thanks for sharing.

      Reply
    14. Serene is my name, not my life!

      June 24, 2010 at 12:14 am

      Oh wow, I so love this idea! I think I'll have to make me one!

      Reply
    15. the thrifty ba

      June 24, 2010 at 12:01 am

      im crafty but i think you could still do this better than me...

      Reply
    16. The Answer Is Chocolate

      June 23, 2010 at 10:57 pm

      Too cool. I'm always looking for things I can do away from the room of doom aka my craft room. So in front of TV or on vacation, these are very portable and cute!

      Reply
    17. chelsea rebecca

      June 23, 2010 at 10:45 pm

      WHHHAAAUUT!??
      this is incredible!!
      seriously going to get some fabric and make these immediately!!
      SO CUTE!!!!

      Reply
    18. Nancy

      June 23, 2010 at 10:39 pm

      Those are so cute! I can see why you'd sit and make several of these at a time.

      Thanks for the tute!

      Nancy

      Reply
    19. Ashley

      June 23, 2010 at 10:33 pm

      OMG I love it! I just wish I was crafty like that! I hope you don't mind another follower!
      -Ashley-

      Reply
    20. Nikki

      June 23, 2010 at 10:10 pm

      I LOVEEEEEEEEEEEEEEE that!!!!!! And I'm definitely an A ๐Ÿ˜‰
      Thanks for linking up to gettin' crafty on hump day ๐Ÿ™‚

      Reply
    Newer Comments »

    Leave a Reply Cancel reply

    Your email address will not be published. Required fields are marked *

    Primary Sidebar

    Hi, I'm Jocelyn. The baker, photographer, and writer behind Inside BruCrew Life. I love creating semi-homemade recipes with a whole lot of flair that will make you look like a baking pro.

    More about me โ†’

    July 4th Recipes

    • A white plate with a square of red white and blue cheesecake bars with whipped cream and sprinkles on it
      Red White and Blue Cheesecake Bars
    • A star shaped rice krispie treat decorated with red white and blue M&M's standing up.
      4th of July Rice Krispie Treats
    • Two red white and blue cupcakes with candy fuse on top.
      4th of July Firecracker Cupcakes
    • 4th of July Cookies

    Popular Recipes

    • A spoon lifting mac and cheese out of a red pot.
      Creamy Mac and Cheese
    • A bowl of creamy tomato soup with grilled cheese squares on top.
      Creamy Tomato Soup
    • A scoop of cheesy pasta being lifted out of a casserole dish.
      Buffalo Chicken Pasta
    • A black plate with a serving of baked pasta on it.
      Chicken Pasta Bake

    Footer

    โ†‘ back to top

    About

    • About Me
    • Privacy Policy
    • Accessibility Policy
    • Work With Me

    Keep in Touch

    • Sign Up for emails and updates
    • Contact us with questions
    • Follow on Facebook, Pinterest, & Instagram

    Read

    • Our Cookbook
    • Baking Basics
    • Recipes

    Copyright ยฉ 2025 Inside BruCrew Life