

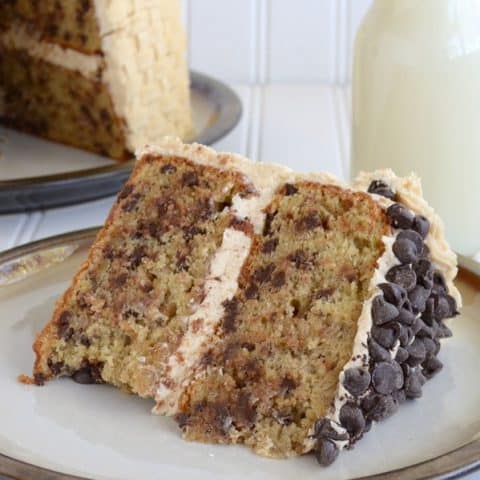
The layers in this Chocolate Chip Banana Cake with Honey Peanut Butter Frosting will have you reaching for another slice in a hurry.

I used to decorate cakes for other people. Real life people. Do you know how stressful that is?
I am kind of a perfectionist (in some areas of my life). So when I would have a cake order, it would make me kind of neurotic. I would spend hours at a time making sure everything looked absolutely perfect. There were times I would scrape it off and start over if there was a line that I couldn't make right.
Then I had to make sure that I was doing it exactly how the customer wanted it.
My most fun cakes were the ones that they said "just do whatever". Actually those were fun but also VERY stressful because what if they hated what I came up with?!?!?
Reality set in and I realized that I couldn't charge enough to balance out the time I was putting into these cakes. So now I just bake when I want to and what I want to. There is waaaay less stress baking for my family.
Although, every once in a while I will take a cake order and then kick myself when I actually have to work on it. In fact, I will try to talk people into cupcakes 9 times out of 10 because they are much easier to do. Plop a swirl on top, and they are good to go.

I created the best banana cake for my birthday this year. Yes, I know my birthday was almost a month ago, and I am just now sharing.
Remember what I said about less stress. That is the fun about blogging. I can share whenever I feel like it.
Today feels like a cake day to me. Plus, with all the veggies I have been eating, I wanted to drool over the Best Honey Peanut Butter Frosting again.
One of my favorite designs to do is the basket weave. This is the one that I will do most times if I have my own choice. It makes such an impressive cake AND everyone thinks it took you hours.

Want to know a secret? This awesome looking basket weave design is actually one of the easiest frosting techniques. Once you have mastered it that is.
I thought it would be fun to show you step by step, so that you believe me when I say it is easy.
Frosting a Chocolate Chip Banana Cake with Honey Peanut Butter Frosting:
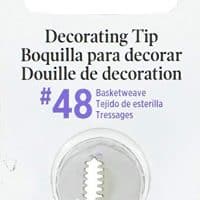
First gather all your supplies, so you can have it all near you as you work. You can purchase all these items at your local Hobby Lobby or Michaels.
- flat plate
- frosting bags
- plastic coupler
- icing tip #47 and #18
- cake leveler
- icing spatulas
Put your cake on a FLAT plate. I had this one on a plate with an edge and it was hard to get the bottom strips of frosting straight down at the bottom.
Level the cakes and completely cover the cake with a thin layer of frosting.
Put the bigger part of the plastic coupler in the inside of the bag. Fill the bag with frosting. Add the metal tip and the small screw part of the coupler.
Twist the bag at the top and hold it between the thumb and index finger in the palm of your hand. Make sure the bag is twisted so that the edged part of the tip is facing up.
Squeeze the bag gently while moving down the side of the cake. Don't worry if it isn't perfectly straight. When you get all the lines on, no one will even notice.

Go back to the top and start squeezing small strips of frosting horizonally across the line. Make sure you leave a space the size of the metal tip in between each one.
You will have to continue to twist the top of the frosting bag so it stays tight in your hand.
Always make sure the edged part of the tip is facing upward. This is what gives your line the basket look.

Now squeeze another straight line vertically over the ends of each small strip.

It starts to get a little tricky right about here.
You want to pipe your small strips opposite the ones you did on the first line.

Each time you add a small strip, make sure the metal tip is down into the peanut butter frosting.
In fact, it will be slightly under the straight frosting line. This makes it look like the frosting is all one piece.

Now I say this is seriously so easy, and it really is. But it does take a lot of practice to get it right.
My first cakes like this were sorry to look at, but I kept trying and now I can whip one out in less than an hour.
Don't give up!! They are so fun to do, and believe me, everyone loves them!!!

After you get all the way around the cake with your lines, add a decorative border to the top of the cake as a finisher. I usually do a backwards S using metal tip #18.
Each time you do another S, you need to make sure the tip is under the last one. By starting under the frosting, it keeps it looking like one giant strip of frosting.
You could also just do a shell border or even a star border on this banana cake.

After all that hard work, you deserve a GIANT slice of frosted banana cake!
Yes, I know, that after putting all that time into making it pretty, you will feel kind of sad to make the first cut.
Believe me, it gets easier with each cake you do.


Recipe
Chocolate Chip Banana Cake Recipe
The layers in this Chocolate Chip Banana Cake with Honey Peanut Butter Frosting will have you reaching for another slice in a hurry.
Ingredients
- 2 yellow cake mixes
- 1 ½ cups water
- ⅔ cup canola oil
- 6 large eggs
- 2 cups brown bananas, mashed (4-5 medium)
- ½ teaspoon baking soda
- 2 teaspoons cinnamon
- 2 cups mini chocolate chips
- 1 batch Best Honey Peanut Butter Frosting
Instructions
- Preheat the oven to 350°. Grease and flour 2 - 8 inch round cake pans. (Make sure they are at least 2 inches tall.)
- Combine the cake mixes, baking soda, cinnamon, oil, water, and eggs and beat on low for 1 minute. Increase the mixer speed a little bit and beat for 2 more minutes.
- Stir in the bananas and chocolate chips by hand.
- Pour the batter evenly into the prepared pans. Bake for 38 minutes. Cool in the pan for 10 minutes, then flip out on a wire rack to cool completely.
- Place one cake layer on a plate and spread frosting on top. Place the second cake layer on top and cover the entire cake with frosting.
- Top with extra chocolate chips, if desired. Cover until serving.
Notes
- If your cake pan is 8 inches by 1 inch, use one cake mix and only half of the rest of the ingredients. Divide the batter into 2 pans, so it doesn't overflow in your oven.
- You can also just bake the cake batter in 2 - 9x13 pans for 30 minutes.
Recommended Products
As an Amazon Associate and member of other affiliate programs, I earn from qualifying purchases.
Nutrition Information:
Yield: 14 Serving Size: 1Amount Per Serving: Calories: 684Total Fat: 31gSaturated Fat: 10gTrans Fat: 0gUnsaturated Fat: 18gCholesterol: 88mgSodium: 688mgCarbohydrates: 100gFiber: 4gSugar: 64gProtein: 9g

Meghan says
I put the recipe I above in a 9x13 and we are 40 mins in and there is no way it is done. Also, the pan is VERY full. Just a heads up…there is no way you need to double the ingredients for two layers!!
Jocelyn says
Oh, no! If you made two cake mixes and put it in ONE pan, it is not going to bake right. The recipe was written to be baked in 2 - 8 inch round cake pans. To bake this exact recipe in a 9x13 pan, you would need to divide the batter into 2 of these pans as well.
Taylor says
I'm sure it's in the comments somewhere, but how long would I cook it if I were using two 8-inch x 1-inch pans to make a double layer cake? And so you're saying with that I still use 2 cake mixes and normal ingredients or do I half everything? Thanks! Can't wait to make this for my boyfriend's graduation tonight 🙂
Jocelyn says
If you are using an 8x1 inch pan, only use one cake mix and half the other ingredients. Then divide it in the two pans to bake. The bake time may be slightly different too, so you will want to watch it carefully. I hope that helps and that you and your boyfriend enjoy the cake.
Megan says
Sorry if this has been asked before, but if I want to make cupcakes, how should I adjust the bake time and temp? Thanks!!
Jocelyn says
I have never made these as cupcakes, so I'm not quite sure of the baking time. I would try 350 degrees and bake for 20-25 minutes. Start checking them with a toothpick inserted in the center and take them out when the toothpick only has a few crumbs on it. I hope that helps.
kim says
I made this cake for Thanksgiving and everyone loved it . I have to make another one this weekend. It was easy to make .
Jocelyn says
I am so glad to hear it was such a hit, and that you thought it was easy to make 🙂
Mimi says
Hello, your cake looks amazing. Thanks for sharing. Well I didn't read the comments here. There us no way it will fit a 8in. I have Wilton, do I had to use 3 9 in since I doubled the batch. It's in oven, so far looks good. Can't wait to taste it. Thank you
ashley says
i just made this recipe too and theres no way that all fits in one pan. i did not double it and i have to over filled 8 inch pans. i scooped some batter out after reading theae comments so i guess we wull see in 38 min
Patty says
I doubled this also and ended up with 3 8x2 layers...this was a awesome cake...was cause the family devoured it!!
CCMCCART says
Just saw this today, best tutorial I've seen yet on this subject. I'm thinking to use it for a carrot cake with cream cheese frosting. Should work out nicely. Thank you for the information. CHEERS, CC
karen lucas says
i will try to make this cake looks yumm and cute.
Kimberly says
I doubled my recipe because this was supposed to make one round cake. I take it from the mess in my oven, it was supposed to make one set of round cakes?
Jocelyn Brubaker says
The recipe is for one cake made in two 8 inch by 2 inch round cake pans. What size pan did you use?
Trisha says
This recipe looks amazing! I've been wanton to try it for a while and decided I will tonight. Thought about making cupcakes instead. How long would you recommend baking them for? Thanks!
Jocelyn Brubaker says
I would bake them about 20-24 minutes. You will have to check with a toothpick to see when it is done. Let me know how you like them!
Trisha says
Thank you! The cupcakes turned out perfect and were a big hit at work! YUM!
Orsi Burley says
Hello there,
It looks absolutely fab. But can I use honey instead of the 4 cups of sugar?
Thank yo very much for your reply!
x
Jocelyn Brubaker says
No you can't take the powdered sugar out of the frosting...it just wouldn't work. Sorry.
Donna says
This cake recipe was so amazingly delish! Took to a church dinner & had many raves. Followed exactly & This recipe made 2 8inch round cakes. The frosting recipe was just enough to thinly layer between the two cakes & the remaining cake. I only added 2 1/2 cups of powdered sugar & a couple more tsp of water as it got pretty thick. My husband is not much of a cake lover & got 2 thumbs up from him. Now, My favorite go to cake!!! Thanks for posting!!!!
Jocelyn Brubaker says
I am so excited to hear that your cake turned out and had so many people like it!!! Thank you for letting me know 🙂
Lyuba@willcookforsmiles says
OH MY.....This looks gorgeous and sounds so delicious!! (You must have so much patience for the basket weave!) One day...one day, I will sit down and make one because I always admired how beautiful it looks!
Jocelyn Brubaker says
Thank you 🙂 It is seriously the easiest thing to do...it just looks so impressive. You should definitely give it a try sometime...I know you would rock it!!!
Dana says
I found you several months ago via Pinterest. I have taken this cake to several events and now get requests for it. I just follow the recipe and put it in a 13 x 9 pan (none of this fancy decorating for me). Just wanted to say thanks for the great recipe. My coworkers and family adore it!